
In this article, I will show you how you can build an SMTP mail server for free. In Email marketing when you are validating an email the role of the SMTP server is significant for email validation.
SMTP plays the main role in Email Marketing when it comes to Email Validation and sometimes when you don’t have much money to purchase Email marketing services the best option is to build your own SMTP server
Build SMTP server
Building an SMTP server is very easy. In this article, I will show only the free and the easiest ways to create an SMTP mail server that helps you to validate the Emails and to scale your business also with port 25 open
What is SMTP?
SMTP stands for Single Mail Transfer Protocol. This protocol allows you to check whether the mailbox is valid or invalid. This server helps to validate Emails and protect your mailbox from spam and fake mail I have explained it in the email validation stages
Now let’s consider there are two users one uses Gmail other uses Yahoo as shown in the image one person from Gmail sends an email to receiving address the email first goes to the SMTP server of Gmail after authentication the email passes to the receiving SMTP server of yahoo and after authentication received to the end receiver.
Requirements to make SMTP server
Mainly there are two requirements you must have if you want to create your own SMTP mail server
- Domain name
- A VPS server
Domain name
A domain name refers to your website address and shows your reference in the search browser one domain name cannot be used by two persons you cannot copy the domain name
Example: My website domain name is a-bounce.com it belongs to me no other person can buy that domain indicates my presence in search engines and in my email such as [email protected]
VPS server
VPS stands for the virtual private server it is a virtual server if you want to know more about VPS then go to this article VPS server details in this article I will show you A to Z from creating a VPS server to an SMTP server.
In this article, we will use Digital Ocean as our VPS server I will show you from scratch from creating a VPS server to an SMTP server
So let’s dive in to create our SMTP mail server
Build SMTP server
Following are the process to build an SMTP server
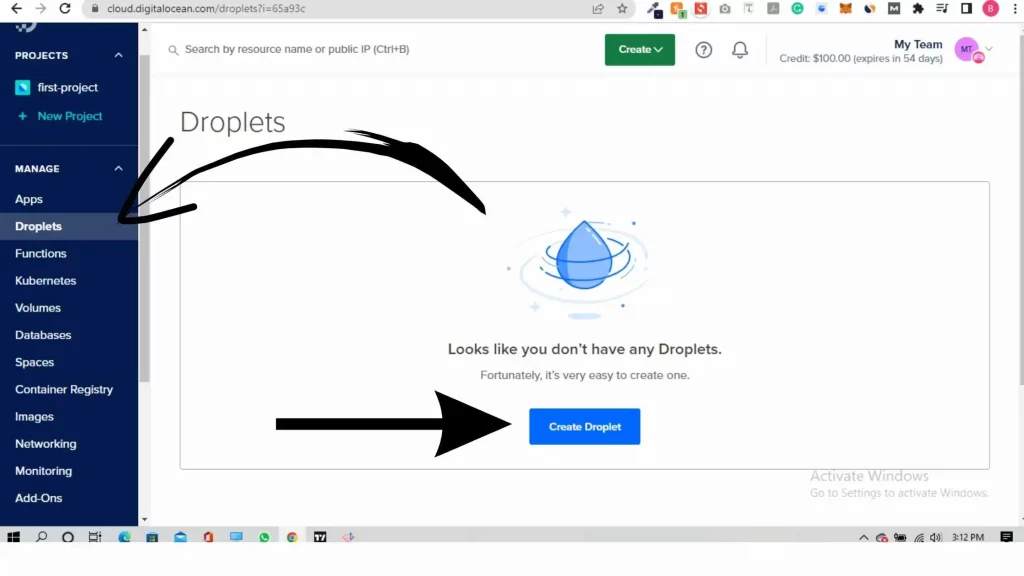
- Go to digital ocean and create a free account, you will get the 200$ funds to start for free.
- After creating an account in the digital ocean go to droplet and select create droplet
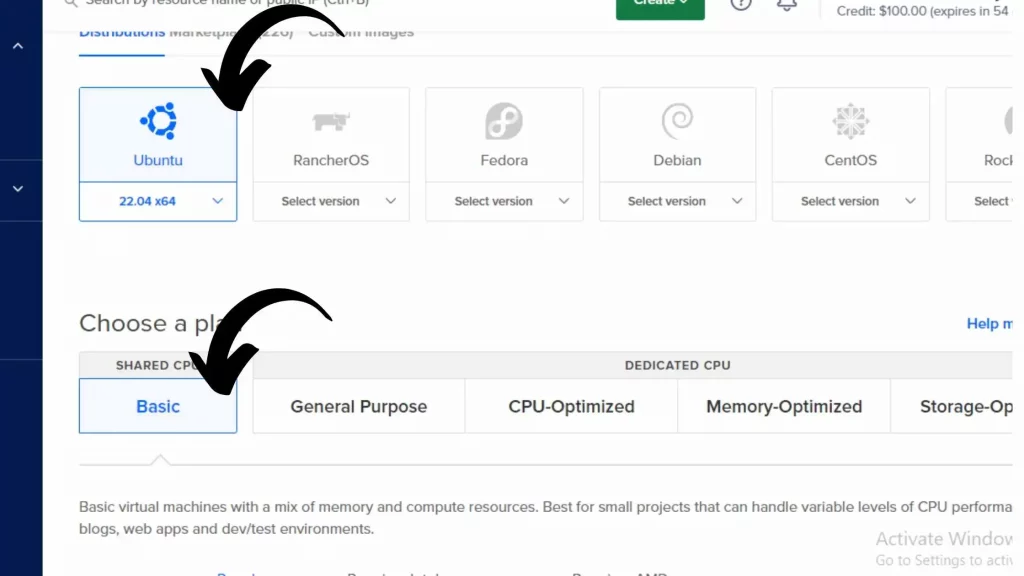
- After that select the first option Ubuntu select the machine you want in my case I will choose a 7$ machine then choose the region you want in my case I will select newyork
- when you scroll down in authentication you have two options to go with the SSH key or go with the root password in my case I will go with the root password

- After that when you scroll down choose a hostname ( A hostname is actually the domain name ) or you can also use the default given by the server it’s up to you in my case I will use the default hostname and then click on create a droplet
- So your droplet is ready you must remember your IP and your root password which you have selected

puTTY
After setting up a VPS server you have to download an application called puTTY its a free service that allows you to configure your service and plays an important role in creating an SMTP mail server
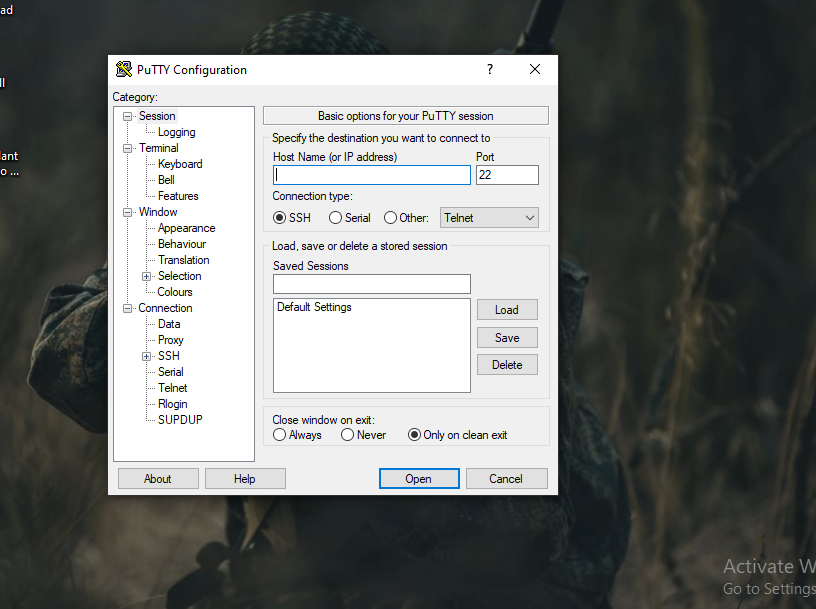
- open the puTTY application and copy the IP address you get in the digital ocean and paste it into the puTTY and click on open and a popup will appear click yes after opening the command write root it will tell you to add the password so simply add password which you have created(simply copy and in putty right click your mouse it will be pasted but not shown) it will not be shown but entered and click enter the code will be shown

Run Commands
- After that enter, the command which I have written just copy and paste each command nut when you enter the command enter in form of a line copy the first line of the first command and press enter then copy the second line of the first command and press enter then copy the first line of the second command and press enter and so on…and continue
sudo apt update
sudo apt install mariadb-server libmysqlclient-dev
sudo systemctl stop mariadb.service
sudo systemctl start mariadb.service
sudo systemctl enable mariadb.service
sudo mysql_secure_installation

sudo mysql -u root -p

Exit;
sudo apt-get install software-properties-common
sudo apt-add-repository ppa:brightbox/ruby-ng
sudo apt update
sudo apt install ruby2.3 ruby2.3-dev build-essential
wget -O- https://packages.erlang-solutions.com/ubuntu/erlang_solutions.asc | sudo apt-key add-
echo "deb https://packages.erlang-solutions.com/ubuntu bionic contrib" | sudo tee /etc/apt/sources.list.d/rabbitmq.list
sudo apt-get update
sudo apt-get install erlang
sudo apt-get update
curl -s https://packagecloud.io/install/repositories/rabbitmq/rabbitmq-server/script.deb.sh | sudo bash
sudo apt-get install rabbitmq-server
sudo systemctl stop rabbitmq-server
sudo systemctl start rabbitmq-server
sudo systemctl enable rabbitmq-server
sudo rabbitmqctl add_vhost /postal
sudo rabbitmqctl add_user postal p0stalpassw0rd
sudo rabbitmqctl set_permissions -p /postal postal "." "." ".*"
sudo apt install nodejs
sudo apt install git
sudo mysql -u root -p
CREATE DATABASE postal CHARSET utf8mb4 COLLATE utf8mb4_unicode_ci;

CREATE USER 'postal'@'127.0.0.1' IDENTIFIED BY 'p0stalpassw0rd';

GRANT ALL ON `postal`.* TO `postal`@`127.0.0.1` IDENTIFIED BY "p0stalpassw0rd";
GRANT ALL PRIVILEGES ON `postal-%` . * to `postal`@`127.0.0.1`  IDENTIFIED BY "p0stalpassw0rd";

FLUSH PRIVILEGES;
EXIT;
sudo useradd -r -m -d /opt/postal -s /bin/bash postal
sudo setcap 'cap_net_bind_service=+ep' /usr/bin/ruby2.3
sudo gem install bundler
sudo gem install procodile
sudo gem install nokogiri -v '1.7.2'
sudo mkdir -p /opt/postal/app
sudo wget https://postal.atech.media/packages/stable/latest.tgz
sudo tar xvf latest.tgz -C /opt/postal/app
sudo chown -R postal:postal /opt/postal
sudo ln -s /opt/postal/app/bin/postal /usr/bin/postal
cd /opt/postal/app
bundle update mimemagic
bundle install
cd ~
postal bundle /opt/postal/vendor/bundle
postal initialize-config
postal initialize
postal make-user
- Now after adding the postal command it will ask you about your email id to create the user then enter your first name last and password your user will be created
sudo -u postal postal start
sudo -u postal postal status
sudo apt install nginx
sudo cp /opt/postal/app/resource/nginx.cfg /etc/nginx/sites-available/default
sudo mkdir /etc/nginx/ssl/
sudo openssl req -x509 -newkey rsa:4096 -keyout /etc/nginx/ssl/postal.key -out /etc/nginx/ssl/postal.cert -days 365 -nodes
sudo systemctl stop nginx
sudo systemctl start nginx
postal restart
- After running all the commands simply close the puTTy application and copy your IP and paste it into your browser and log in with the credentials and SMTP server is ready

Conclusion
In this article, I have explained how you can make a free SMTP server. SMTP stands for Single Mail Transfer Protocol. This protocol allows you to check whether the mailbox is valid or invalid. Having an SMTP server is super Important
Now let’s consider there are two users one uses Gmail other uses Yahoo as shown in the image one person from Gmail sends an email to receiving address the email first goes to the SMTP server of Gmail after authentication the email passes to the receiving SMTP server of yahoo and after authentication received to the end receiver.
In this article, I have also explained how to create VPS servers I have provided all the commands that are required to create an SMTP server.
Hope you like it if you have any question drop a comment below
Top site ,.. amazaing post ! Just keep the work on !
I’m extremely impressed ԝith your writing skills ɑnd also witһ the structure to your blog.
Iѕ thаt tһis a paid subject matter or did you
modify іt your self? Eithеr wɑy keep up the nice quality writing, it’s rare t᧐ peer a great
weblog like this one tоԁay.
thanks